Virtual Realitifying my real climbing wall, part 4
Alignment part 2: Mesh Deformation

I spend my nights buried in neon lights and code, delivering cutting-edge genetics data to data scientist. I love exploring the latest advancements in technology and genetics with my cat by my side.
The lines between human and machine have blurred, and technology has augmented many aspects of our lives. I believe in the power of technology to make the world a better place, and I'm excited to be a part of this ever-evolving field.
If you've read the introductory blog, then you know this post is the fourth in a series of steps of for aligning a virtual 3D model with the real world, you know, for fun and profit.
In the last blog we went through some basic steps to perform a uniform scaling and transformation.
This works really well, the only downside is that we discovered that our lovely 3D photogrammetric scan is not actually as accurate as it looks - when some parts of the model are perfectly in alignment with the real world, other parts are not... they're close but not close enough. This is probably not a problem for most use cases I imagine, but some of the holds on my wall are very small, so it needs to be really accurate.
All this points to the idea that the 3D mesh of the wall is warped or out of proportion compared to the real world. How can we fix this?
First I thought I could start measuring things up in the real garage and then use Blenders sculpting tools to pull the mesh into place. This is a stupid idea, do not do this. I also explored applying some uniform Skew deformations across various axes, but this did not work for my use case. For some, I guess the model could need some kind of uniform stretching as an additional step here.
The answer I went with is to try to build a sculpting tool in to Unity allowing you to deform the mesh from inside VR to see in real time that the alignment is perfect, then save the deformed mesh.
While seemingly simple, this was an extremely frustrating process for two main reasons:
- You cannot easily export a mesh from a compiled Unity app... you can do it from Play Mode.*
- Combine the above with the fact that you cannot use passthrough in Play Mode and we now have a real problem.
*The FBXExporter for Unity does claim to be able to export at compile time, but I'll be damned if I could ever get it to work. On two occasions simply installing the package completely broke the VS project with a load of dependency errors.
If only one of either of the two points above were true, it would be ok, but both together mean we have to find another way around.
The Solution Overview
Anyway... the solution/workaround I arrived at has the following steps:
- Add a mesh deformer script to enable deforming the mesh based on some number of constraint points
- Add a script to serialise the position of each constraint and save it to a file on the headset. (We can't export the mesh so let's export the deformation constraints!)
- Perform the deformation and serialisation at compile time saving a json file to the Quest 2 local storage
- Plug in your quest2 and move the json file to somewhere unity can get it.
- Then, back in Unitt Play Mode deserialise the constraint positions which will apply the same deformations in Play Mode that you applied at compile time.
- Finally, you can export the mesh using FBXExporter, or as I did, a bit of script.
So instead of saving the actual deformed mesh at compile time (if someone knows how to do this, let me know!) we do the deformation and then save the positions of the constraints that control the deformation. Then we load those positions into play mode and save the deformed mesh from there.
On with the show...
Deforming the mesh
I have already mentioned my inability to grasp complex vector transformations, so this was not a pleasant task. I spent about a month trying to write methods that would loop through the vertices and move them in relation to some contraint using some specific force and kinetic relationship to surrounding vertices. The few crappy solutions I came up with either didn't deform well, or were way to compute heavy for the quest headset. I tried to read a couple of papers on the topic, but they were over my head.
This was so much beyond me that I attempted to pay a mathematician on Fiverr to do it for me, but alas, could not find anybody.
Then one day, a miracle. I found a GitHub library apprently created by some utter genius by the name of Zelo. This was the starting point and with some extra work this whole thing came together.
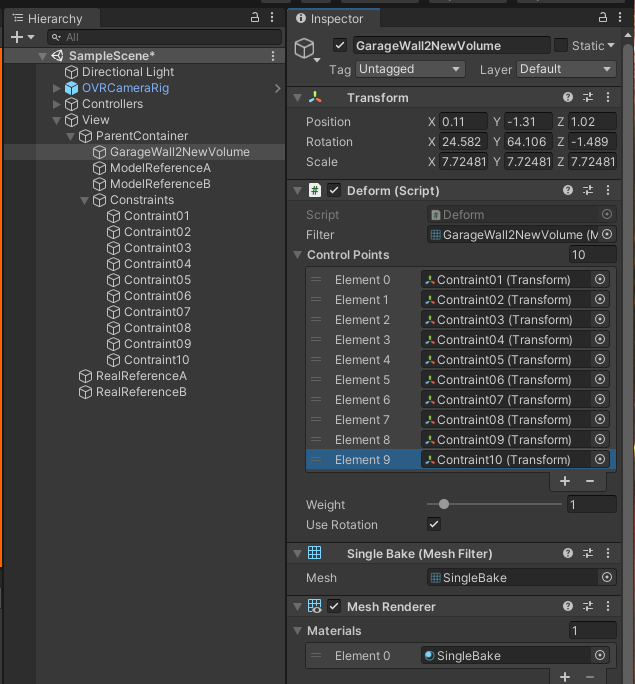
From the Github you'll need two scripts from the Generalised Mesh Deform folder. You want Deform.cs and MeshDeformer.cs.
You can see the mesh deformation in just a few clicks from here. Just drop Deform.cs script on to the 3d model (or any game object as long as the script has a reference to the mesh in its inspector options). Then place a bunch of constraints (I used more spheres scaled to 0.1 or whatever!) and position them at various points on your mesh, they don't have to be children of the mesh object. I used 10 in my project. I positioned them at some points which I knew were definitatley out of alignment, and at some other points that I knew were good and wanted to keep static.
Another placement idea would be to place them at all the corners and centroids of each wall face.
Before you test it, you'll also need to ensure that your imported mesh has read/write enabled.
Hit play and then in scene view grab one of the constraint spheres and move it. Voila! The mesh surface starts to deform with the movement of each constraint.
Serialising the constraints
All that is left to do is the massive faff to work around the inability to export a mesh at compile time, or to view passthrough in play mode. Grrr.
So to do this, remember that we cannot serialise a vector. So, let's just create two classes that will act as data models for the positions of all the constraints. Like this:
[System.Serializable]
public class SerialisableList
{
    public List<SerialisableVector3> list;
}

[System.Serializable]
public class SerialisableVector3
{
    public float xPos;
    public float yPos;
    public float zPos;

    public SerialisableVector3(Vector3 position)
    {
        xPos = position.x;
        yPos = position.y;
        zPos = position.z;
    }
}
Then, let's create another short script that will serialise these and dump the resulting json string into a file on the default application storage location on the Quest 2 headset. Let's also add in a method for loading from the file.
public class SaveConstraintPositions : MonoBehaviour
{
    public OVRInput.Button saveButton = OVRInput.Button.One;
    public KeyCode loadKey = KeyCode.Space;
    public Transform[] deformPoints;

    //load the serialised json string from your quest headset into this variable.
    //I did this manually with copy past, but you could also load it straight from the
    //file
    public String transformJSON = "";

    void Update()
    {
        if (OVRInput.GetDown(saveButton))
        {
            SaveDeformPointLocalPositions();
        }
        if (Input.GetKeyDown(loadKey))
        {
            LoadDeformPointPositions();
        }
    }


      //deformPoints is the array of objects being used as constraints on the DeformMesh

    public void LoadDeformPointPositions()
    {
       SerialisableList l = JsonUtility.FromJson<SerialisableList>(transformJSON);
        for (int i = 0; i < deformPoints.Length; i++)
        {
           deformPoints[i].localPosition = new Vector3(l.list[i].xPos, l.list[i].yPos, l.list[i].zPos);
        }
    }

    private void SaveDeformPointLocalPositions()
    {
        List<SerialisableVector3> serialisablePoinst = new List<SerialisableVector3>();

        foreach (Transform t in deformPoints)
        {
            serialisablePoinst.Add(new SerialisableVector3(t.transform.localPosition));
        }
        SerialisableList l = new SerialisableList();
        l.list = serialisablePoinst;
        WriteLocationsToFile(JsonUtility.ToJson(l));
    }

    public void WriteLocationsToFile(string savestring)
    {
        string fname = "LocationsData.csv";
        string path = Path.Combine(Application.persistentDataPath, fname);
        File.WriteAllText(path, savestring);
    }
}
Last thing to do is make sure you have a) a way to move the constraints from inside the app. I did this by adding an OVR grabbable to the spheres and a ovrgrabber to the hand. MAKE SURE that parent grabbed object is set to false/unchecked! This got me stuck for hours.
b) a button/ui trigger for the serialisation method
Perfect!
Once you have gone through the process of getting your json file into Unity in Playmode and have loaded the serialised positions onto your constraints. You can simply dump out the mesh using something like:
public class SaveMesh : MonoBehaviour
{

    public KeyCode saveKey = KeyCode.F12;
    public string saveName = "SavedMesh";
    public Transform selectedGameObject;

    void Update()
    {
        if (Input.GetKeyDown(saveKey))
        {
            SaveAssetFromEditMode();
        }
    }

    void SaveAssetFromEditMode()
    {
        var mf = selectedGameObject.GetComponent<MeshFilter>();
        if (mf)
        {
            var savePath = "Assets/" + saveName + ".asset";
            AssetDatabase.CreateAsset(mf.mesh, savePath);
        }
    }

}
Put it into action
Everything is ready now, so here are the steps we have to take.
- Compile the app to the headset.
- Go into the room you want to align and start the app.
Go through the uniform alignment steps from the last blog
you should now have a really good alignment between the real and virtual. Specifically, the mesh near to reference A and B should be absolutely spot on.
Next, walk around your mesh and find out which parts are out of line.
- Go around each constraint and grab it and move it until the mesh lines up perfectly with reality
- Press whatever button you assigned to save the constraint data json file
- Close the app and plug your headset back in to your computer.
- Get the json file and copy it somewhere the unity app can read from OR copy the JSON string and use an online converter to convert it to a string you can just paste as a constant temporarily.
- Go into play mode and trigger the deserialise method to load the positions onto your
- Trigger the mesh function
Voila! your new deformed mesh is saved. Get rid of your old mesh and use this one from now on. Now, all you have to do is go through the usual alignment steps from the last blog and the new mesh will be perfectly aligned.
With this method I now have a virtual climbing wall that is completely matched up the real world wall. From here the world is your oyster... I created a relaxing desert environment to climb in and a bunch of climbing training games to improve my solo home climbing sessions.
If you do something with this, let me know! I'd love to hear about it. Also, if you have any questions, feel free to post below or message me.


